
What makes a perfect 3d tree?
Do you think that making your 3d trees will never concern you? Guess what? It’s simple and pretty much affordable! Just learn the story behind a growing tree and make your 3d assets today!
By COMMONPOINT / Mar 05, 2021 / 12min READ

Topics covered:
-
01.
What's the Story Behind a Tree?
-
02.
Tree in a Context of Nature
-
03.
How to Make a Perfect 3d Tree?
-
04.
Step 1 - Making a Basic Shape of a Tree
-
05.
Step 2 - Preparing 3d Geometry
-
06.
Step 3 - Sculpting / Fleshing Out
-
07.
Step 4 - Adding (bark) materials
-
08.
Step 5 - Final Detailing
-
09.
Bonus Step - Winter Variation
-
10.
Conclusion
-
11.
Annotations / Links
You should look at a tree as if it was a giant plumbing system. The trunk and branches are pipes that transport water, nutrients, and hormones between the roots and leaves. Also, this system will promote the branches with access to the sunlight, and the ones that lost it will eventually fall off. Keeping that in mind, let’s see how a tree grows when it has optimal access to light and water:

Obviously, conditions where trees live, aren't perfect, so they always need to adapt. Often, trees wait for decades until they get access to the desired sunlight. Also, they are surrounded by obstacles, so they need to adjust to their shapes as well. You can see how a tree sprouted next to a wall look like in the example below.

Eventually, due to lack of light or water, certain parts of a tree will fall off or be removed. That process is called “pruning,” and it happens naturally all the time. Now, guess who has a significant impact on this process as well? That’s right! It’s humans and animals. Let’s see how a tree grows uninterrupted apart from one pruning in its mid-life (on the left) compared to a tree that is pruned every five years (on the right):

Young and fresh shoots grow fast, so trees used to be pruned regularly to maximize their timber production. People have been treating trees in various ways for millennia. We can list 3 of the most popular types of pruning:

-
01.
Coppicing
all branches are removed repeatedly close to the ground level.
-
02.
Pollarding
upper branches are removed at the height of a few meters. -
03.
Shredding
side branches are removed repeatedly, leaving the main trunk and top growth.
Thinking about all of that knowledge we just gained, let's see how the act of pruning affects a tree. The one on the left grew naturally, and the tree in the middle was pollarded once after five years. The last one was regularly pollarded every five years. Now, just take some time and focus on the differences in their shape.

We can see that the very act of regular pruning introduces a lot of intricateness (one might say: character) into how the crown is being shaped. Certainly, it is only a CG simulation, but it is not so far from reality. The more complex a tree appears to be, the more possible it is that some past human actions shaped it. Natural occurrences like lightning, strong winds, or heavy snowfall can also have a tremendous impact. Anyway, next time you see a tree in real life, try to read the history that is imprinted in its shape. And later on, try to use that knowledge to tell a story in your images.
A tree in the context of nature
The look of a tree might depend strongly on the place where it sprouted from a seed. Let's have a quick tour through the most popular contexts (more about this subject coming up in „A Handy Guide to the Most Popular Ecosystems”)
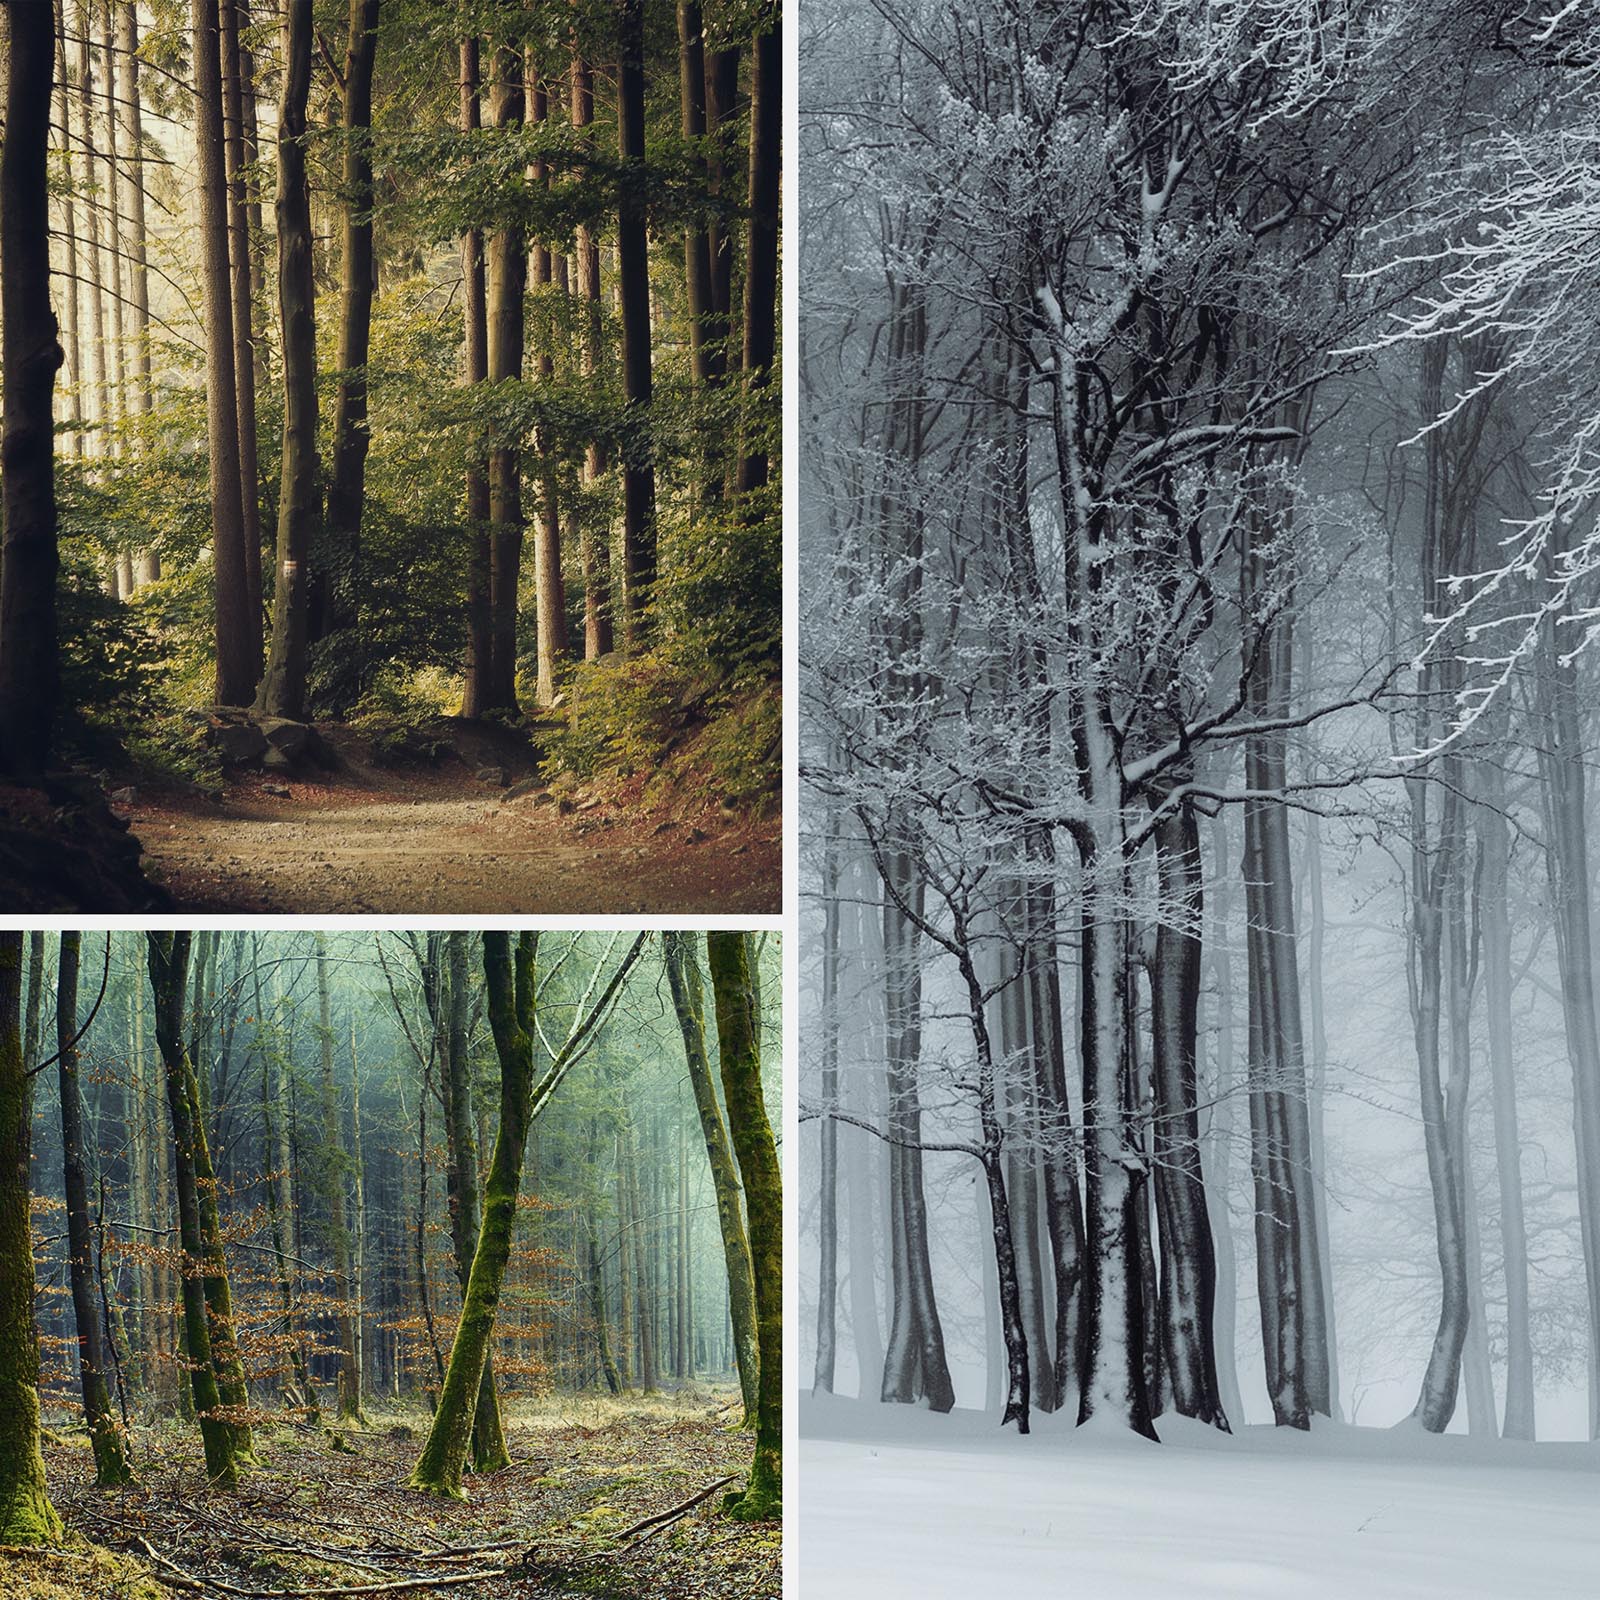
Forest
A tree here is thin/slender with extensive branching limited to the upper third of its height. The light is very limited in a forest, so a young tree grows very slowly in older ones’ shade. It waits for its moment, when a big neighbor dies or collapses, and then speed up and fill up the break in the canopy.
Field
A tree here is bulgy/corpulent, it is relatively symmetrical, and its crown can spread all the way broadly from the top to the very ground. A tree in the field doesn't need to compete so intensely, and it doesn't grow as high as in the forest. In fact, it can be very productive even at the ground level.


Rural
A tree here coexists with humans and is expected to be beneficial for them. Basically, those kinds of trees have been imprinted into some kind of idyllic landscape impression. Willows are planted to drain the water from wetlands and used to yield wicker. Orchards produce fruits, and other trees lend their shadows to ease the traveler on a summer day.
Urban
A tree here tends to be shaped entirely by human treatment. In an urban environment, it can be of great value. It lowers the temperature and cleans the air. Unfortunately, it’s not an easy scenario for a tree. It usually grows surrounded by artificial obstacles and can be pruned each year to maintain the desired shape.

We hope this short description will help you choose a tree, depending on what landscape you need to develop. The selection of trees affects the reception of works, so next time ask yourself - what type of assets can I use? Or even better, let me make them yourself, now!
How to make a perfect 3d tree?

3D Tree
Grove3d / Blender / 3dsMax / Corona Renderer / Zbrush
There are many possible workflows when making a 3d tree, and you might have heard of GrowFx or Speedtree. However, the method we will present here it’s not the most popular one, but it has three advantages: It’s affordable, easy and fun!
General Workflow

-
01.
Making a Basic Shape of a Tree
Using presets to shape a general tree (Grove3d / Blender)
-
02.
Preparing 3d Geometry
Preparing scattering system (3dsmax / Corona Scatter) -
03.
Sculpting / Fleshing Out
Adding detail to trunk (Zbrush / 3dsmax) -
04.
Adding [bark] Materials
Using Triplanar Mapping and CoronaDistance (3dsmax / Corona Renderer) -
05.
Final Detailing
Adding that extra flair to the tree (Megascans / 3dsmax)
In those five steps, we tried to pinpoint the process’s main features. After two initial steps, you will already have a decent-looking tree (for real), even if you’re a beginner. Additional steps involve somewhat of a 3d experience, but they give amazing results. We hope it inspires all of you to explore the world of making your 3d trees at some point in your career.
Step 1Making a basic shape of a tree
Let's start by making a basic shape of a tree. We’ll be using Grove3d add-on to Blender (you don't need to know Blender to do it!). The software simulates the growth of a tree year after year, and you can get one by simply choosing the preset and clicking „Grow” a few times. You can also prune it between the cycles to add some random character, just like so (click and swipe left/right):

Grow / Prune
Grove3d
Using Grove3d feels just like being a 3d gardener. The process mimics the natural tree behavior, so you cannot plan it entirely in advance. You will probably start over a few times, but it is a quick and enjoyable workflow - just have some fun and experiment with it. You can dive into additional settings, but it usually only takes Grow + Prune to get what you want.
“Quick start your tree – Alder, Ash, Birch, Linden, Maple, Oak – 14 presets capture a variety of tree forms. Thousands of species are just a couple of tweaks away.” Grove3d.com
Step 2Preparing 3d geometry
Grove3d gives us 3d mesh for the trunk and branches, and it uses a scattering system to place the twigs (end branches with leaves, acorns, etc.) at the top of geometry. If you are doing the rest of your project in Blender - you are already good to go. We are switching to 3ds max, though, so we turn off twigs (we will replace the scattering system later) and export an .fbx. The imported model has several material IDs assigned to it. ID1 is reserved for all trunks and branches, while the higher numbers mark the faces that can be used for twig scattering. First of all, let’s create several models’ variations by merely removing some leaves and bending them. We then detach the faces for scattering and distributing them using Corona Scatter (adjust the density to your liking) with normals aligned.

Twig variations / Scattering setup
3dsMax / Corona Scatter

Twig Model

Scatter Density
Corona Scatter / Corona Renderer
At this point, we have the main geometry and total control over the twigs, which is really cool. But let’s be honest: it is far from what we want to achieve here. The sausage-like trunk geometry that Grove3d produces is the biggest drawback of this software. We will slightly cover it with a texture in Step 4, but let's see how we can improve on it even more:
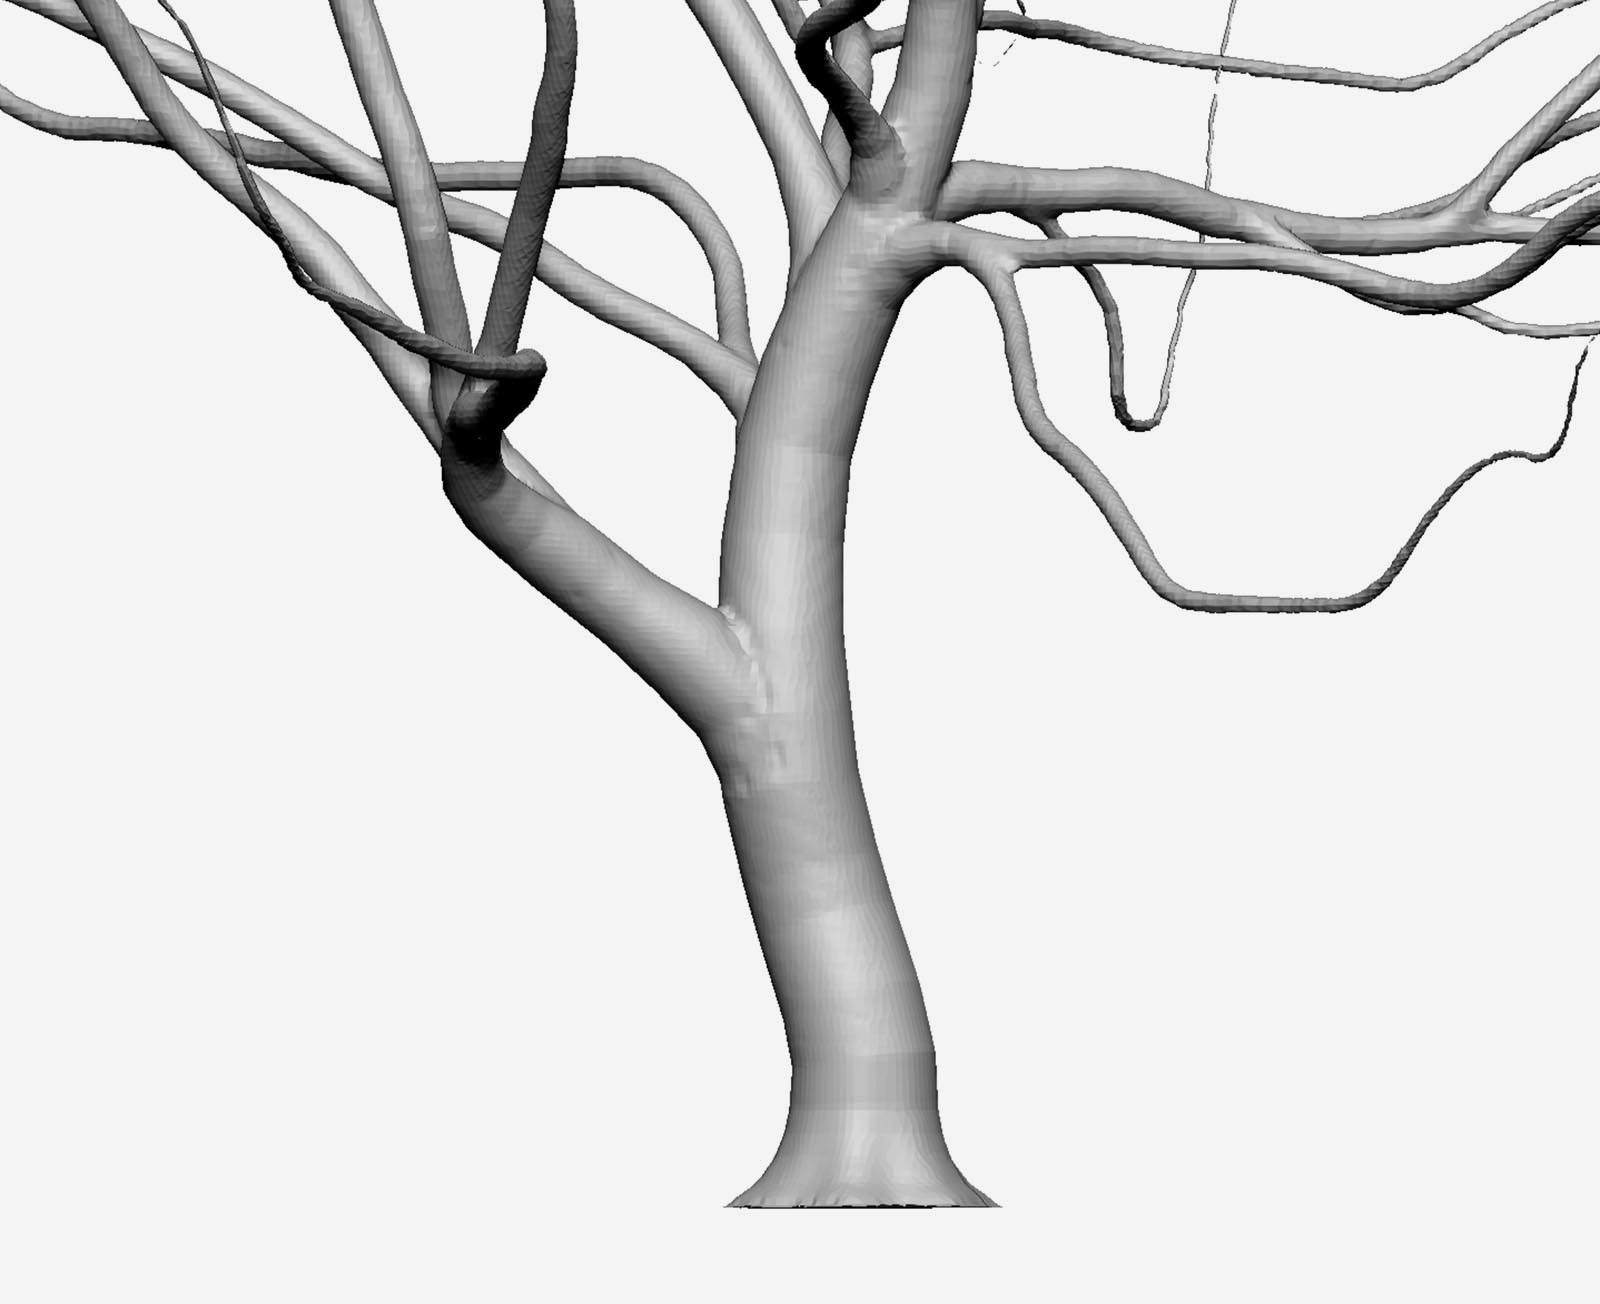
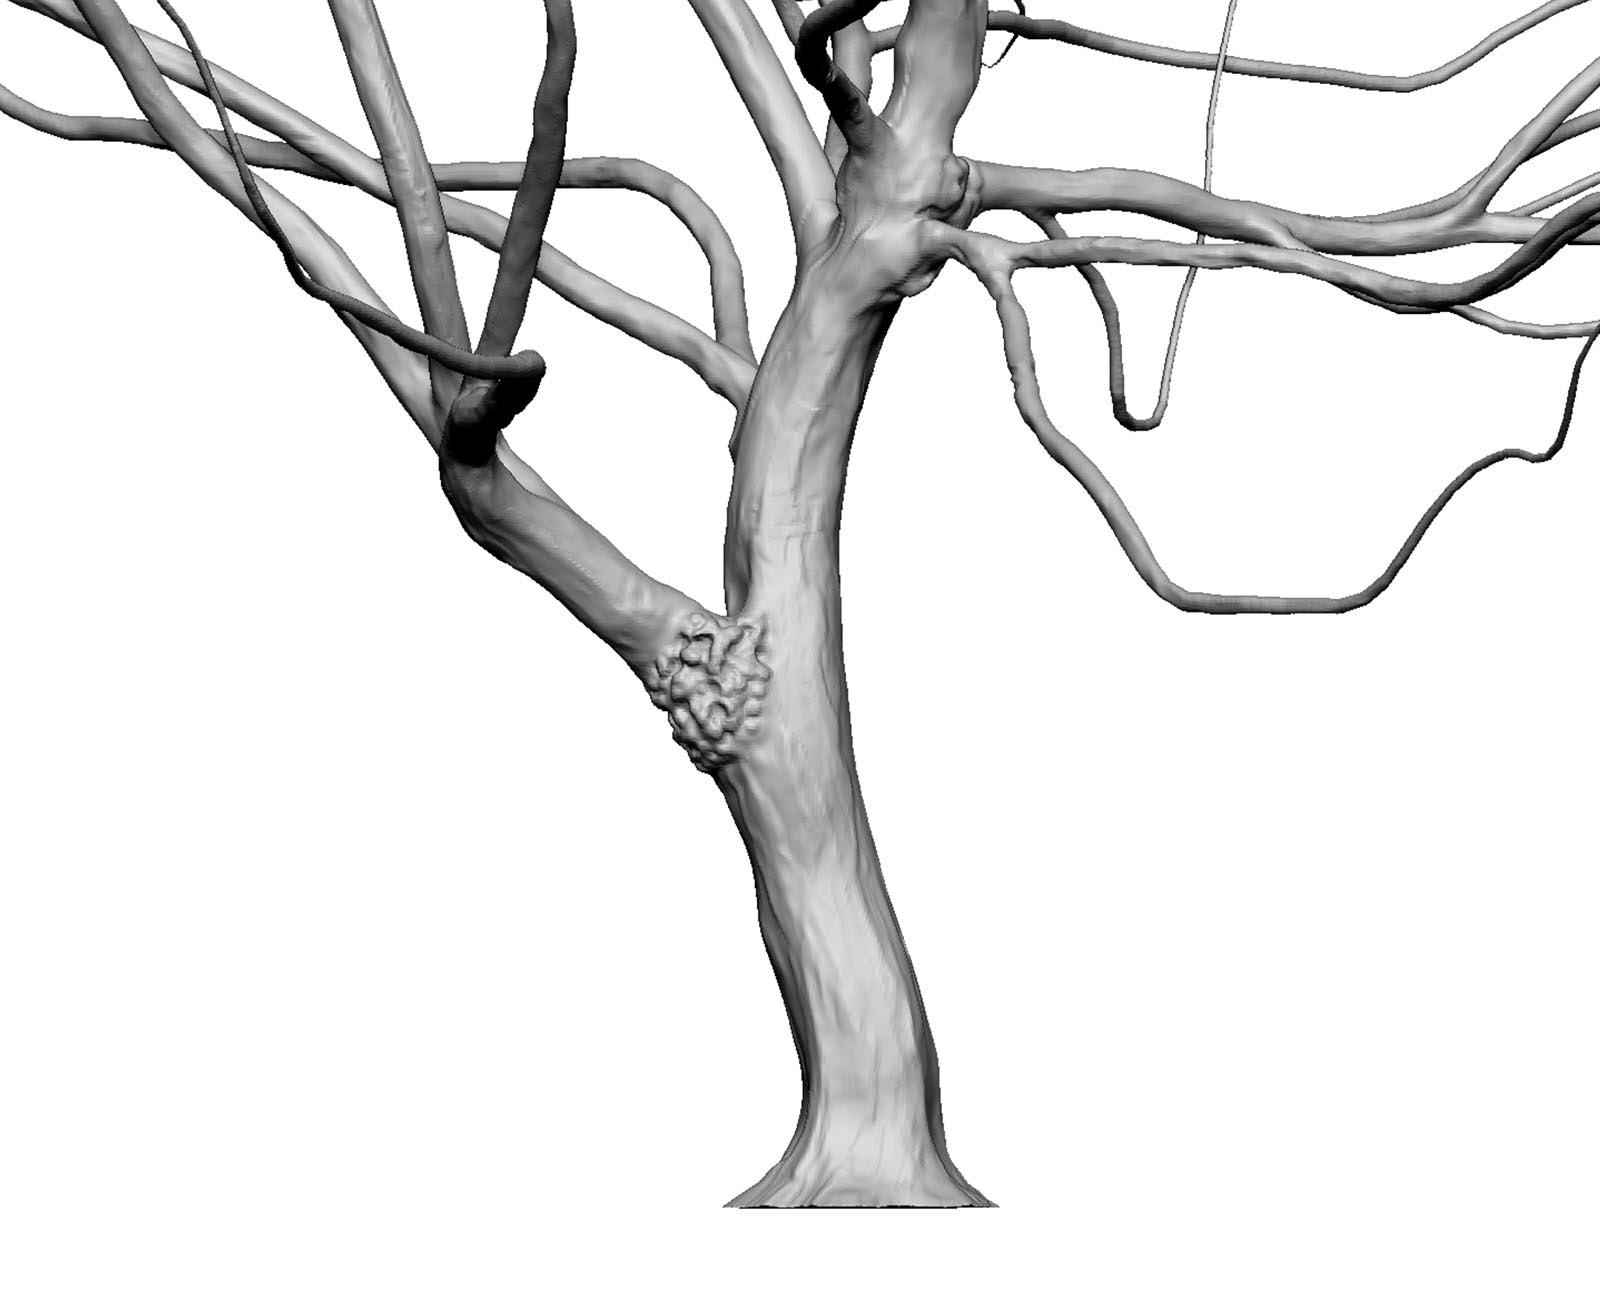
Step 3Sculpting / Fleshing out
The superficial, somewhat cylindrical trunk usually makes the tree look unrealistic so that we will focus on that part in this step. You can use a straightforward method of push and pull deformation in 3ds max. Just add some nuance to the surface, especially in the areas connecting the trunk with major branches. Remember that you can also use this technique for existing trees (Maxtree, Evermotion, or anything really).
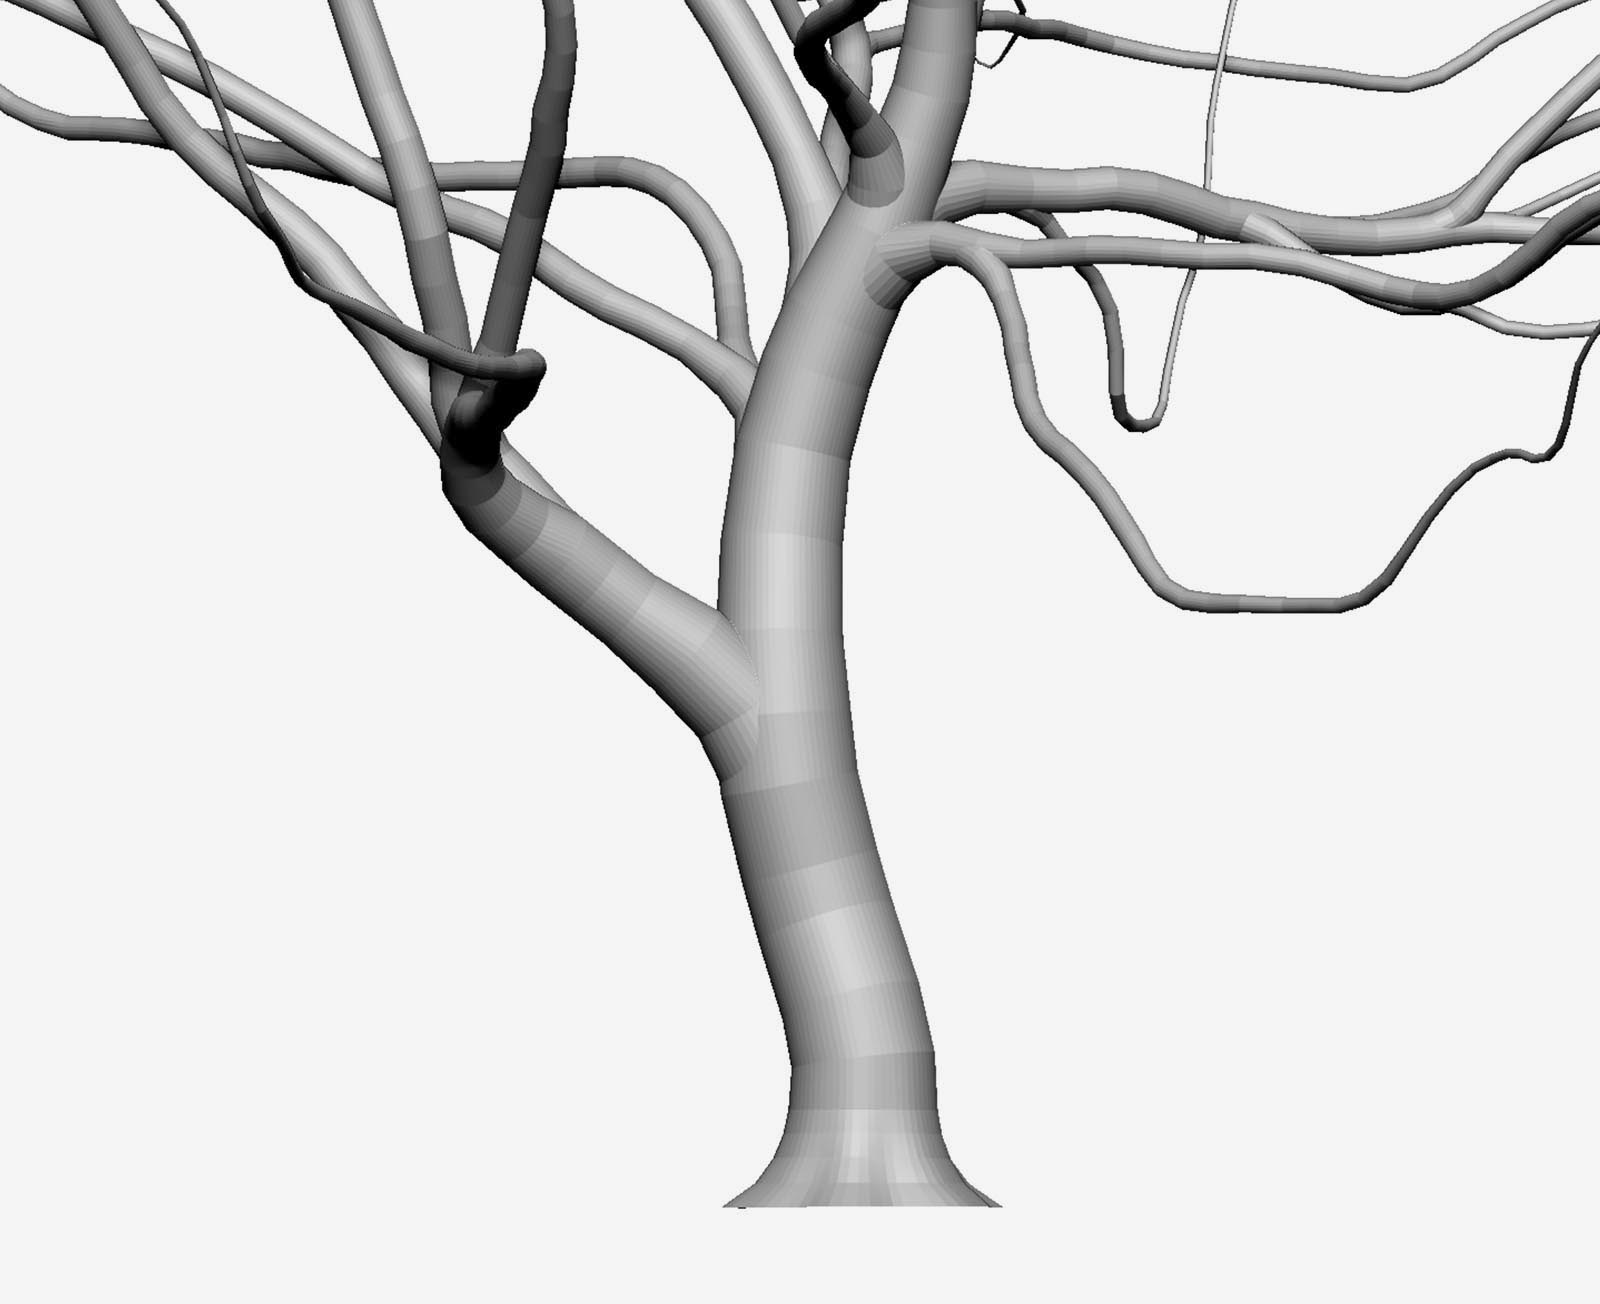

If you have access to Zbrush, though, you can expect even better results. You can export the trunk as well as main branches to Zbrush and turn it into dynamesh. This gives you the continuity between the elements to sculpt the details. The biggest trade-off in this workflow is that you lose the mapping, but we will work around it later anyway, so don’t worry about it. Again, we just want to add some variation to the surface, and when you’re done, just export it back to 3dsmax.
Step 4Adding (bark) materials
In this step, we will primarily cover the bark material (realistic-looking plants coming up in the article called “Yes! To fresh Greenery”). The bark is a highly directional material, and you will get the best results by unwrapping the geometry. Remember that we sculpted only the main trunk and a few major branches in step 3, so most of the smaller elements are already unwrapped straight from Grove3d export. However, geometry in our example is pretty complex, so we tried to avoid unwrapping, and a simple triplanar mapping did its job. We used relatively omnidirectional texture, so, in the end, it worked just fine:

Bark Texture
Quixel Megascans

Triplanar Mapping
Corona Renderer
We also tried to alter the material so the tree’s shape feels more organic. What we mean is that a branch’s surface is smoother close to a young twig, and it can get pretty cracked close to a trunk. Keeping that in mind, we can place a non-renderable dome and use CoronaDistance map to switch between two materials. One of them is used for the inside of a dome, where we need more displacement. The other has almost no displacement at all because the branches should look smooth there. We also use Top/Bottom material, so the top of the geometry is covered with moss and gives that extra detail to the branches.


Step 5Final detailing
By now, we have an excellent tree, but guess what, we can make it even better. Let's take advantage of all that photogrammetry available online. Roots, knots, burls – everything that can enrich the trunk’s visible portion. We can simply incorporate real-life scanned parts into our model. Work your way in 3dsmax and put those parts inside the trunk. Deform them slightly to make the meshes blend as smoothly as possible. Your 3d scans will probably be taken from various species of trees but don't worry, as long as you adjust albedo and glossiness to feel uniform with your main texture, you should be on the right way to pull this trick off and make it all feel consistent.
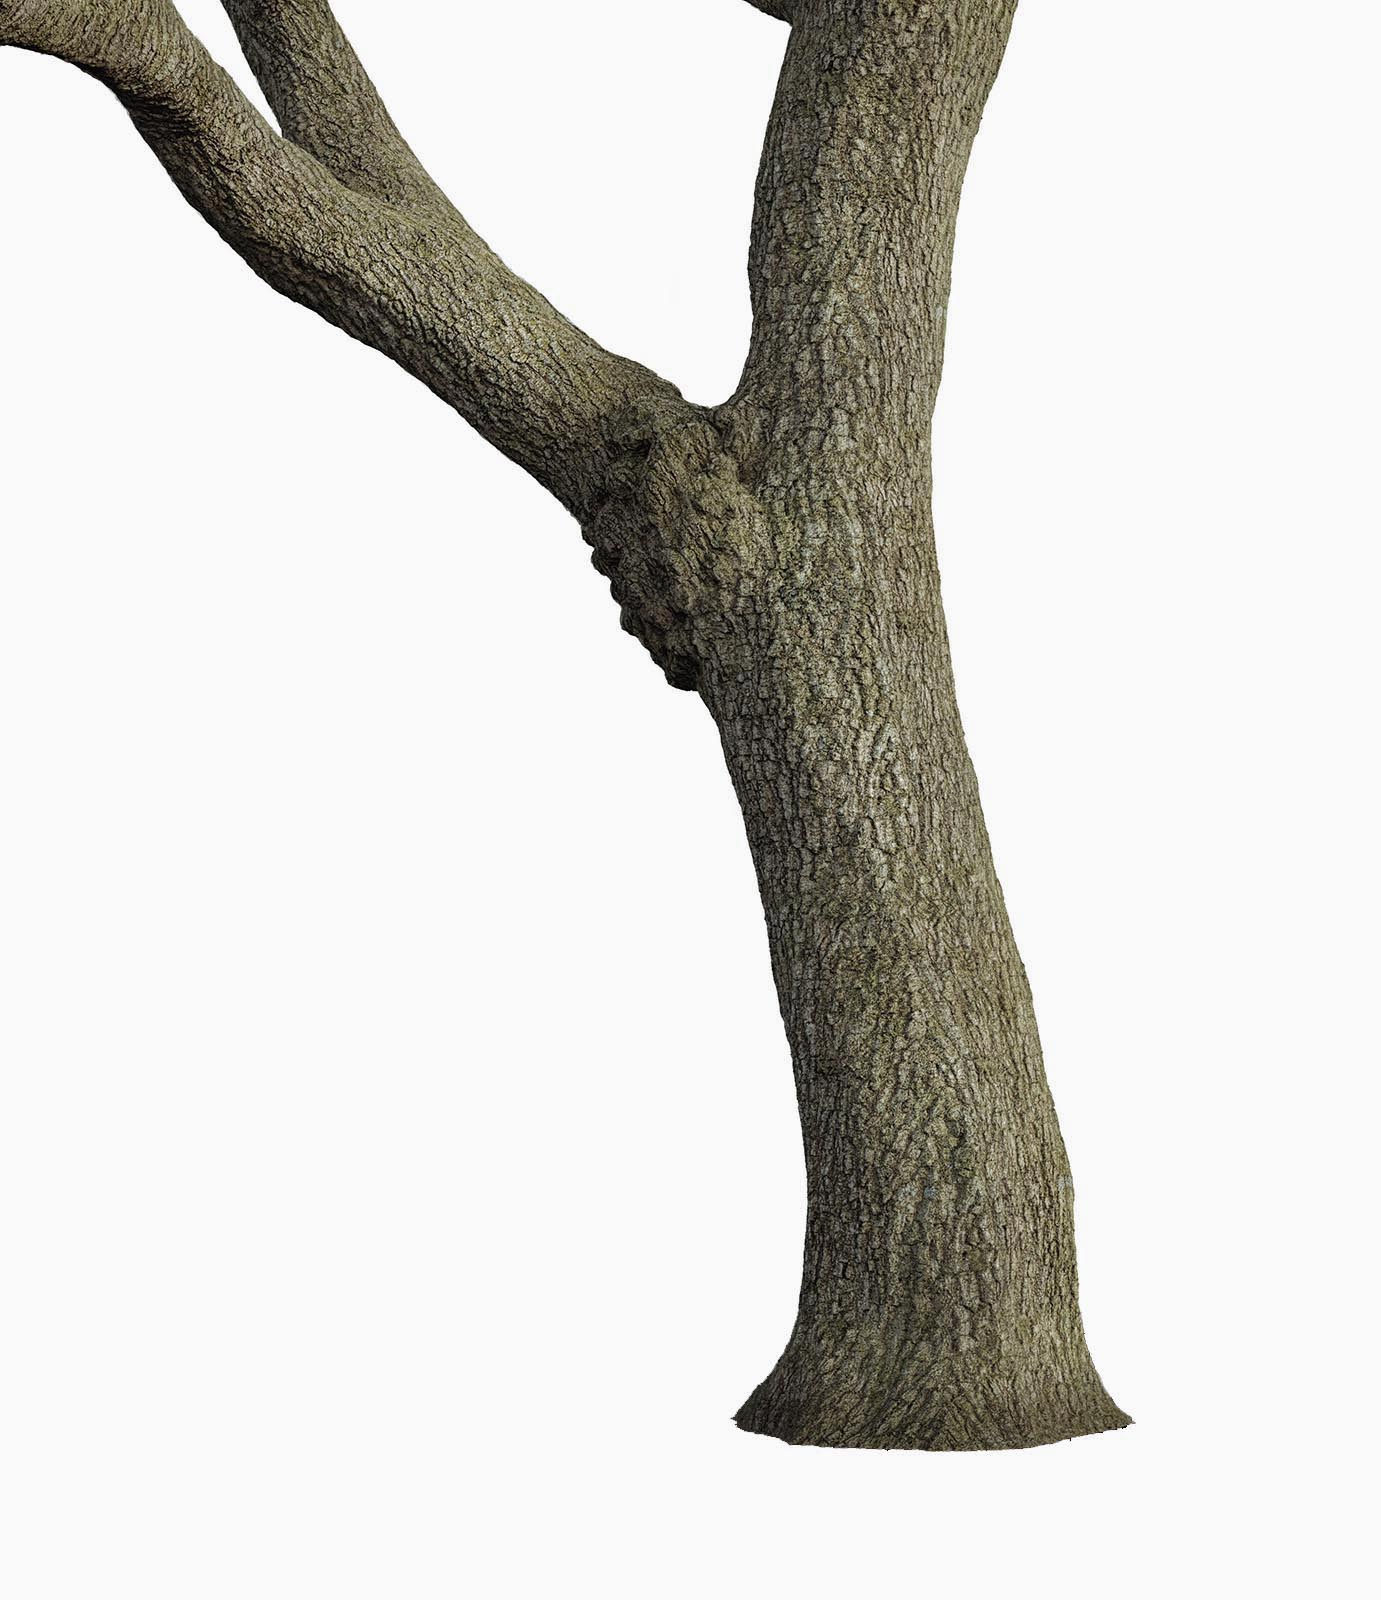
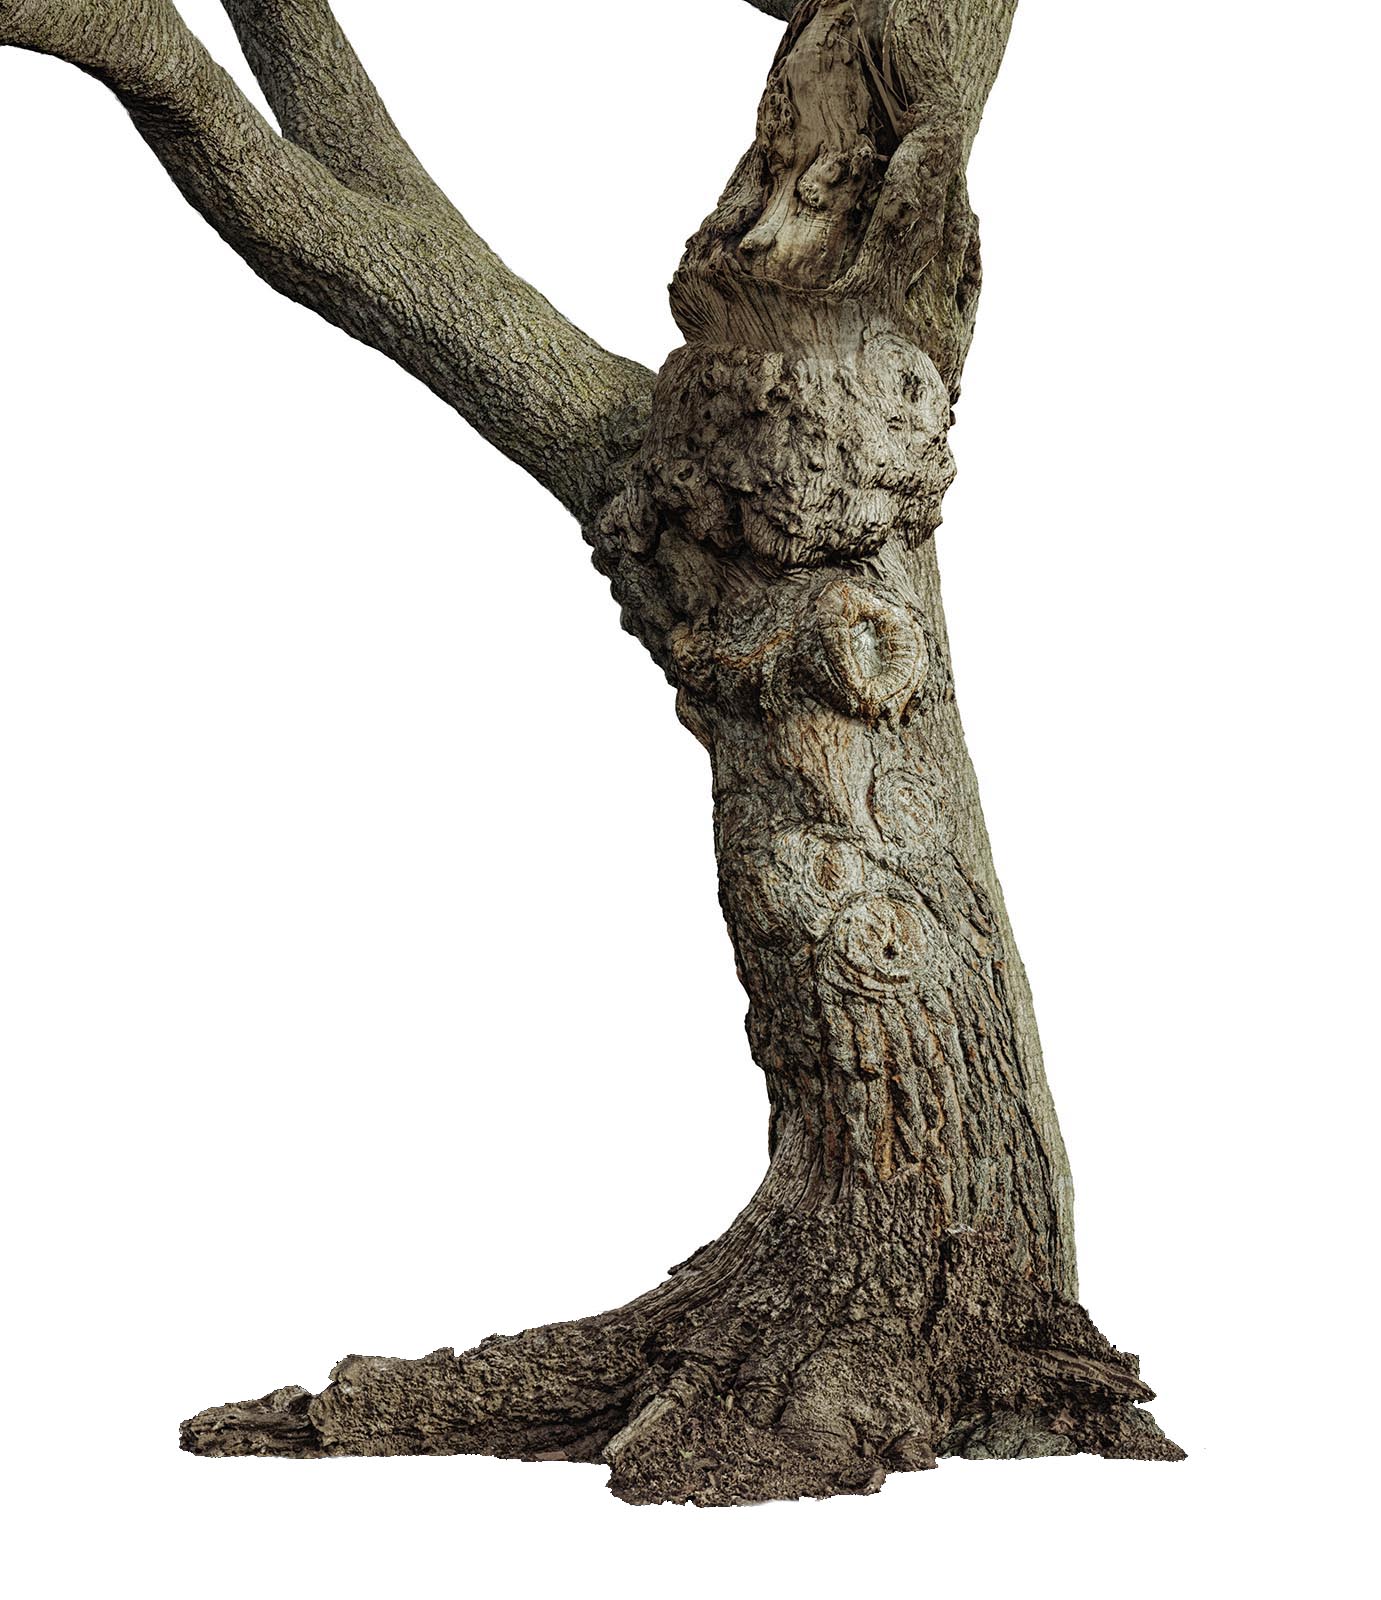

With some extra help, we can further blend our textures and kitbashed elements. Hopefully, there are a lot of plants that like to grow on trees. From moss to ivy, to strangler fig. From subtle to robust. Additional vegetation can help you mix everything together. In the example below, we used only some simple moss to cover those parts where 3d scans and base mesh intersect. We manually painted vertex color over the geometry to define scattering areas and used it as a map in Corona Scatter.

Vertex Paint
3dsMax

Moss Rendering
Corona Renderer
Now, we’re done! Unless you want something extra!
Bonus StepWinter variation
Our tree already looks perfect in the summer, but we can take one more chance to prepare additional winter/autumn variations. Usually, removing the leaves is not enough to make a good winter variation. In reality, hardly any tree is barren after the leaves fall. There are always some withered ones left, accompanied by a few remaining berries or acorns (obviously depending on the species). Furthermore, branches end not with flat polygon caps but with tiny buds that await the spring. All these elements add up to the perception of varied thickness that is rarely seen in 3d trees.
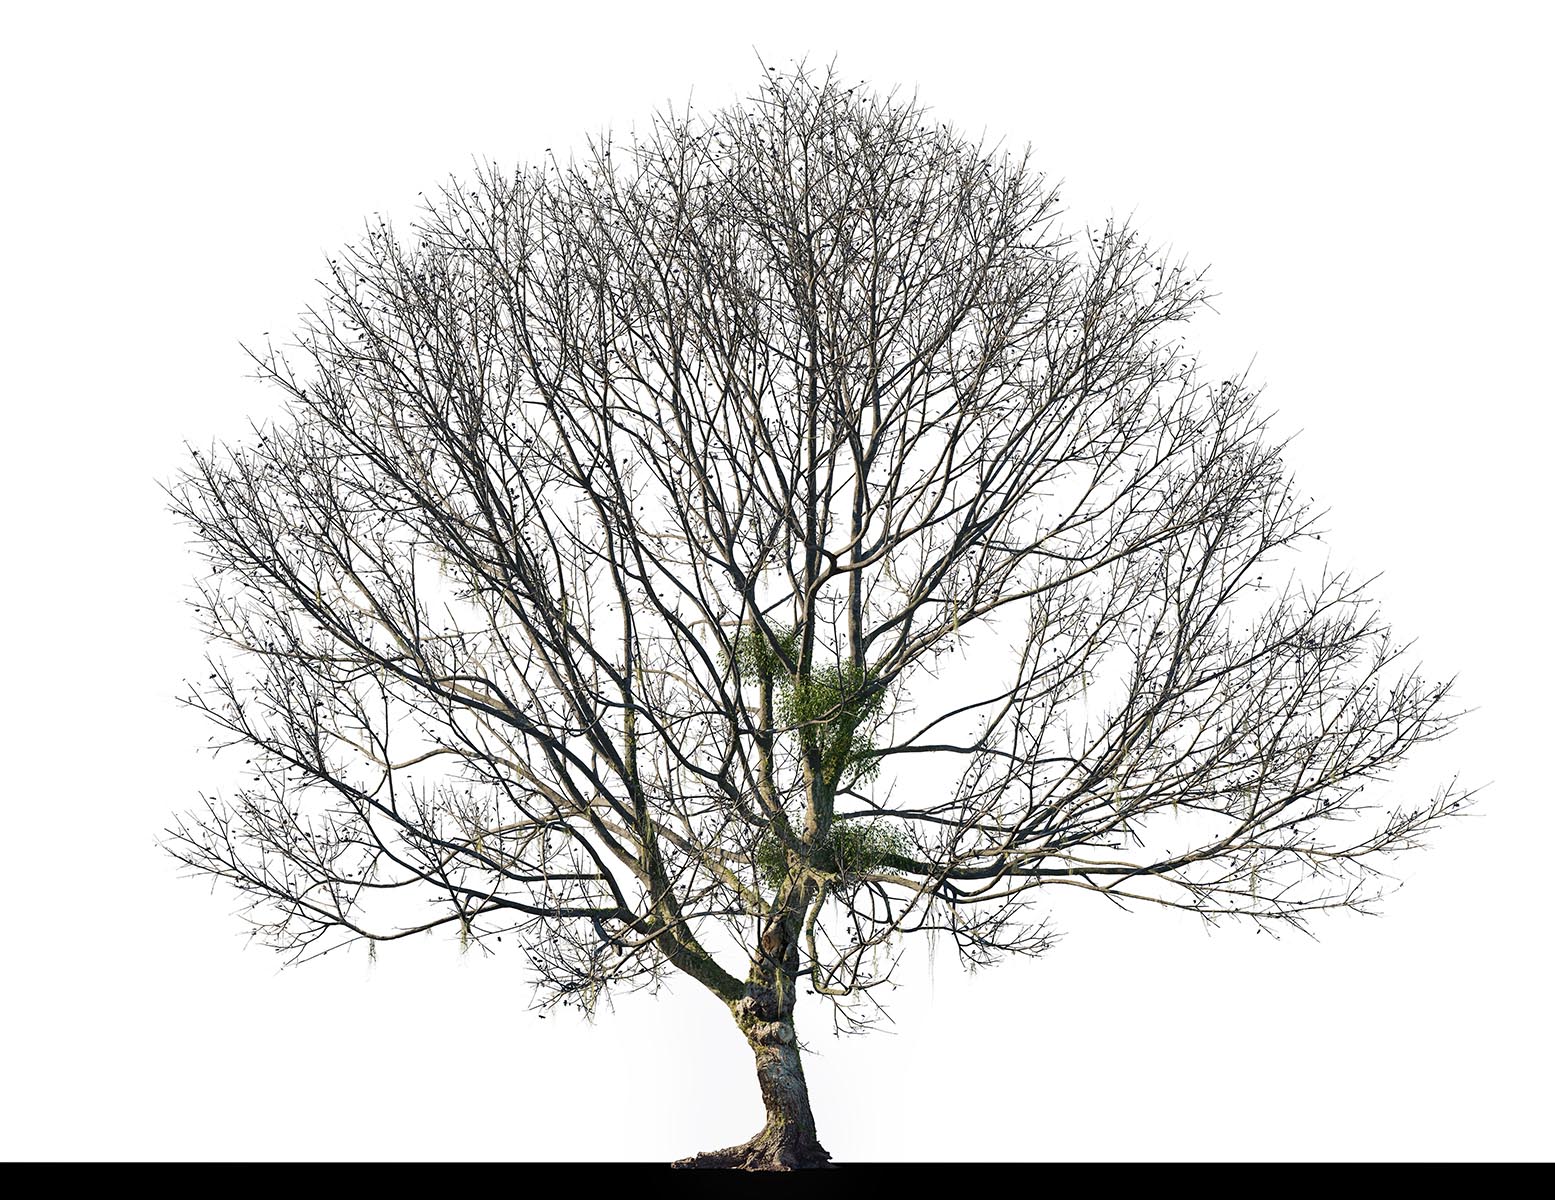
Fortunately, we still have our twig scattering system, and this is another scenario in which we can put it in use. We can quickly modify distributed assets by removing most of the leaves and weathering the remaining ones’ appearance. It is essential to find the sweet spot in which those „leftovers” are visible, but they are not too abundant. Last but not least, remember what we just did in Step 5? We can again add more substance between the bigger branches. Let it be mistletoe or a bird's nest, there is often some jumble in there, and we can easily emulate it by manually placed assets.
Conclusion
We hope that this article gives you a different perspective on the world around us. Often, we don’t reflect on things surrounding us, but something as mundane as a tree might be a fascinating topic. So just look around you, and try to break down any subject you wish. We guarantee that’s a lot of fun!
Artur: This article was a real treat. I couldn’t imagine how fun it's going to be to talk about trees :) I will never look at a tree the same way again. It’s so powerful and so accurate: “A Tree bears a history that is imprinted in its shape.”
Bartosz: I hope that this patchwork tree creation technique will inspire you to try things differently. Juggling between software might seem difficult if you are not familiar with it but it is usually a really efficient way to get things done.
Enjoyed this article?
Check CommonPoint MasterclassAnnotations / Links
Photos taken from:
https://unsplash.com/
https://pixabay.com/
https://www.pexels.com
Software list:
Grove3dCorona Renderer
3dsmax
Blender
Zbrush
Scanned 3d models:
3D Burl / 3D Canker3D Root
3D Knot
3D Knot
Twigs
SIGN UP
Stay Tuned!
Enjoy the upcoming free content, all of the updates on our work and other cool stuff we’re preparing for you.
Leave us your email and always be the first to get noticed.